 Link to the Index Page
Yashica Rangefinder Photography Questions and Answers
Last Update June 22, 2013
This Q & A may also apply to other camera makes, and is a mini photography course.
Yashica Electro 35mm Range-finder G Series Camera Specifications at a Glance
Lens: Yashica Yashinon Color DX 45mm 1.7 Made in Japan G: ASA 12 thru 500
GSN: ASA 12 thru 1000 Gold Mechanica GT: ASA 12 thru 1000, Model MG-1 only: Yashica Yashinon 45mm 2.8 Made in Japan. ASA Settings 25 thru 800
Important Links to related sites and service providers can be found at the end of the Q & A section.
Q. What is the 'B' setting for?
A. With the camera in "B" [bulb], position, the shutter remains open as long as you hold down the release button. Handy for long exposures of night city-scapes etc. You need to take a group of shots at various lengths of time, and hope one comes out, until you get experience doing that. Try 10 secs, 20 secs etc. up to a minute. With the Yashica Electro series, the camera itself can time itself out correctly to 30 seconds at least. A cable release which screws into the top of the shutter release button is a great help in time exposures. These shutter release cables are not only more gentle in triggering the shutter, thereby avoiding motion blurring in the shot, but also usually have a lock that can be enabled to keep the shutter open in the Bulb mode for extended periods.
Q. What are the chances of taking indoor shots without a flash using 100 ASA speed film.
A. The Yashica and Minolta Hi-Matic lenses are so fast, that if you have a room with a fair amount of sunshine coming in through the windows and light colored walls and ceiling, there is no reason that it would not only be possible, but would be a considerable advantage when taking pictures of small children.
Color negative films such as Fuji and Kodacolor are balanced in response to light on the assumption that Daylight or Daylight colored flash will be used. For that reason, artificial light indoors
will, depending on it's ratio to sunlight, cause your pictures to lean toward red coloration. Often this can not be compensated for in printing. A picture taken near a sunny window in a room which has both light colored walls and ceiling should require no flash or other artificial light source.
Since you are dependent on reflected light, expect the light that is reflected by your clothing to be noticeable on the subject. Dress accordingly!
Exposures made under fluorescent light will have poor color balance. There are just too many types of these lamps to make having a selection of color compensation filters on hand feasable. The best option is to try to overwhelm the influence of the fluorescent light with a powerful flash.
The use of Black & White film removes this problem and surprisingly, a lot of photographs look better in B & W. Additionally the image in the prints is formed by metallic silver and will not fade like a color print, particularly in contact with some plastic album sleeves which are murder on color prints.
Q. How can I adjust the EXPOSURE indoors ?
A. Fortunately the procedures suggested below can be tried out without film in these cameras. This gives you the chance to make some notes and also to get the feel of the shutter release button in the exposure test mode without firing the shutter and later exposing the film unintentionally.
The shutter speed selection is automatic. To find out if a correctly exposed shot is practical indoors [ or anywhere ], simply test it.
First be sure that the shutter release 'on' lever is in position. Then advance the film so that the shutter is cocked. Set the RED arrow on the lens at AUTO. Set the Aperture to 3.5. This is halfway between 4 and 2.8. [ The smaller the number the bigger the lens opening to gather light ] Frame your shot and slowly partially depress the shutter button until a Red or Orange arrow light comes on in the viewfinder. If the Red arrow lights it means more light is reaching the lens then the automatic shutter speed selector can deal with. Turn the aperture ring to a larger number [ toward 5.6 ] until the light goes out.
If the Yellow light comes on it means there is not enough light for hand held shooting because the shutter speed is too slow. Try increasing the exposure by turning the aperture ring toward 1.7. If the light goes out, great! If not, you need to rest the camera on something or use a tripod. In ALL cases when neither light comes on, conditions for a good shot exist.
[ Unless of course the camera electronics don't work. ] See if the battery test button lights up the little window that shows the frame counter. [ This feature is not on the MG-1 ]
Obviously the smallest lens opening [ highest f. number that you can use ] that results in no lamp being on, is the one to use to get the greatest depth of focus.
The reverse is true. This makes it possible to focus on your main target and throw everything else off a bit to make your subjects stand out from surroundings. Shooting faces?.... focus on the eyes!
If everything else is a little "soft" that is usually flattering to your subject.
Q. Can I use filters with my GS camera and what would the thread size be?
A. The entire G series require 55 mm thread screw in filters which are a standard size, and can be found in any well stocked camera store. Lens caps and other slip-on attachments require a 57mm size. Use of a protective filter when there is a possibility of water spray at the beach etc. is a good idea. Using a UV [Ultraviolet] filter is an all around good choice but without a short lens shade, it could pick up a lot of flare. So you need to consider this for each shot. The only lens shade for these camera is really too shallow to help much. Obviously the correct size shade would block the Viewfinder / Focus and Light Sensor.
Using a colored Special Effects or Color Temperature Correcting filter or a Polarizing filter involves making the needed exposure compensation. With the G/GS/GSN series, the only way to compensate for that, is to reduce the ASA Speed setting dial according to the Filter Factor provided with the filter. For example, suppose that you wish to use a filter that has a filter factor of 2X, that reduces the light passing through it by half. If you are using 100 ASA film. Reset the ASA film speed indicator on the camera to ASA 50 to fool the camera into providing the added exposure compensation needed. Don't forget to reset the correct ASA when you remove the filter. The table below makes a handy reference.
|
Convert ASA / ISO Index to FILTER FACTOR |
ASA |
Colour or Neutral Density Filter Factor |
| 1.5 |
2 |
2.5 |
3 |
4 |
5 |
8 |
12 |
16 |
32 |
| 1000 |
650 |
500 |
400 |
320 |
250 |
200 |
125 |
80 |
64 |
40 |
| 800 |
500 |
400 |
320 |
250 |
200 |
160 |
100 |
64 |
50 |
32 |
| 650 |
400 |
320 |
250 |
200 |
160 |
125 |
80 |
50 |
40 |
25 |
| 500 |
320 |
250 |
200 |
160 |
125 |
100 |
64 |
40 |
32 |
20 |
| 400 |
250 |
200 |
160 |
125 |
100 |
80 |
50 |
32 |
25 |
16 |
| 320 |
200 |
160 |
125 |
100 |
80 |
64 |
40 |
24 |
20 |
12 |
| 250 |
160 |
125 |
100 |
80 |
64 |
50 |
32 |
20 |
16 |
10 |
| 200 |
125 |
100 |
80 |
64 |
50 |
40 |
25 |
16 |
12 |
8 |
| 160 |
100 |
80 |
64 |
50 |
40 |
32 |
20 |
12 |
10 |
6 |
| 125 |
80 |
64 |
50 |
40 |
32 |
25 |
16 |
10 |
8 |
5 |
| 100 |
64 |
50 |
40 |
32 |
25 |
20 |
12 |
8 |
6 |
4 |
| 80 |
50 |
40 |
32 |
25 |
20 |
16 |
10 |
6 |
5 |
3 |
| 64 |
40 |
32 |
24 |
20 |
16 |
12 |
8 |
5 |
4 |
2.5 |
| 50 |
32 |
25 |
20 |
16 |
12 |
10 |
6 |
4 |
3 |
2 |
| 40 |
25 |
20 |
16 |
12 |
10 |
8 |
5 |
3 |
2.5 |
1.6 |
| Yashica Guy has
rounded off results to the nearest ASA setting |
No adjustment is required for the Yashica MG-1, CC, CCN, GL, Minolta Hi-Matic and other cameras which have the light sensor behind the mounted filter, so that compensation is automatic.
Q. I have read that using a flash bracket gets rid of red-eye. The only ones that I have seen only displace the strobe by around 5". This is nothing like the stands pros use in a studio. Can this really work?
A.The answer is yes. Based on the number of pictures that I have taken with both bulbs and strobe guns over many years using a flash bracket, there was not a single instance of "red eye". An additional advantage of using a flash bracket is, that in the event that the strobe gets bumped in a crowded setting, the considerable leverage exerted by it will not tear off your hot shoe.
On the Yashica the shoe is held in place by 3 brass rivets. Use of a bracket also provides a secure grip on the camera, and will give you an entirely new feeling of control. So now you have 3 good reasons to make that minor investment.
many years using a flash bracket, there was not a single instance of "red eye". An additional advantage of using a flash bracket is, that in the event that the strobe gets bumped in a crowded setting, the considerable leverage exerted by it will not tear off your hot shoe.
On the Yashica the shoe is held in place by 3 brass rivets. Use of a bracket also provides a secure grip on the camera, and will give you an entirely new feeling of control. So now you have 3 good reasons to make that minor investment.
Q. Can I use Electronic Flash outdoors?
A. Any Electronic Flash that is not specifically dedicated to a particular camera will work with these cameras. You do NOT need to set the shutter in the flash position unless you are using your grandfather’s left over old flash bulbs with most of the Yashicas. See the Guide to your model found via the Home Page. Most will 'synch' at all but the highest few speeds. Great for lightening deep shadows on faces in bright sun.
It is suggested that you do not use the Hot Shoe. Mount the flash on a generic flash bracket [widely sold] which reduces the chance of Red Eye, by keeping the flash as far from the lens as possible. It also provides a more secure and comfortable grip for the camera.
Q.
The Yashica Electro shutters are Aperture Priority, but is there any way at all that I can control the shutter speed?
I am hoping to get some shots of my daughter's soccer team in action.
A. That is an interesting question because it has implications for all shutter priority cameras regardless of manufacturer, which have user controlled aperture selection. I believe that Robert Spillman [writing in Amatuer Photographer, published in the U.K.] , may have been the first to articulate this in print with regard to the GT when the camera was first introduced there.
When you understand the relationship between the aperture stops and the percentage of light between them, it actually becomes quite simple to control. Each ƒ stop on the lens barrel, namely, 16 - 11 - 8 - 5.6 - 4 - 2.8 - 2 - 1.4 represents a 100% change from the adjoining setting. As the numbers get larger, the amount of light transmitted by the lens becomes LESS, because this number is NOT the size of the lens opening but is the ratio of the size of the lens opening [aperture] to the focal length of the lens. With this in mind, it is not difficult to follow the procedure.
In daylight photography, set the lens opening to maximum for the sake of simplicity. This is 1.7 on the 'G' series. Now slowly press the shutter release button until you see the red over exposure lamp. Then adjust the lens opening until both the red and yellow lamps are out. At this point your camera is set for the correct exposure with the shutter set at 1/500th sec.
If you wish to cut the shutter speed in half to 1/250th second for the sake of greater depth of focus, move the indicated lens opening on the barrel to the next 100% smaller aperture setting. For example if the lamp went out at ƒ 5.6, decrease the lens opening by 100% to ƒ 8.0
Obviously you can move from one mid point to the next. To obtain an exposure of 1/125 th second, you would move the lens by two increments to ƒ11. Try this without film in the camera to get the hang of it.
There is a really fast and reliable method of of controlling the shutter speed of an Aperture Priority camera. For example a camera used in a photography class workshop must obviously enable the student to control the shutter speed precisely to study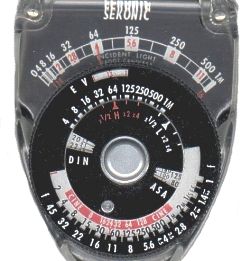 it's effects on how an image is captured.
By using an exposure meter, which is a lot cheaper than buying another camera, the meter reading can indicate at which lens aperture to set the camera in order for the Electro shutter to select your intended shutter speed.
The dial of a popular incident meter is displayed here as an example. Set the ASA to match the film in use. In this case 100 ASA.
Take a light reading and point the dial indicator [ H which signifies that a high intensity screen is in use] to match the illumination level which the readout needle indicates. This reading as you can see is at 64 on the outer scale.
Now look at the shutter speed / to ƒ stop range. It shows that for the prevailing light condition you would set the lens at ƒ4.0 in order for the shutter to fire at 1/500th sec. If you wanted to take a shot to see how a running stream would look at a lower shutter speed, you may decide to expose that frame with the lens set at ƒ16 which would cause the Electro shutter to fire at 1/30th second. Unfortunately the Yashica Lynx 1000 is the only camera reviewed on this site which enables the lens to be stopped down to ƒ22. This is a major advantage usually overlooked by lens makers today.
Q. The self timer on my GSN is very quirky and sometimes does not complete it's travel. Is this hard to fix?
A. The lubricant in cameras that are 40 years old or more tends to stick the self timers and sometimes they will travel almost all the way but fail to trip the shutter. 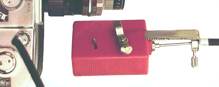 Sometimes they can be nudged back, but often they jamb leaving you with an expensive repair. I urge all users of the Yashicas and Minolta Hi-Matic NOT to use their self timers. It could wreck your camera. To bring the seriousness of this hazard home, I coined the phrase “Self Destruct Lever” to describe the Self Timer. The solution is to use a shutter release cable and use an outboard clock mechansim to delay the shutter release. These devices may disappear as Digitals take over, so get one while you can.
Q. I have been entrusted with a Yashica GSN which has been in the family since it was purchased by my Dad in a PX. It still looks like new, and takes great shots. What can I do to make sure it remains that way?
A. Excersize the camera from time to time. Fortunately the Yashica Rangefinder shutter can be wound with the film advance lever without the need to have film in the camera. This may help to prevent the old lube from sticking the shutter blades and generally keeps moving parts clean.
Most importantly never leave the battery in camera when it will not be used for a while. You can store the battery by cutting 2 strips out of the plastic can that the film comes in, and threading the carry strap through it. Even if you misplace the battery, that's a lot better than having the camera destroyed if it leaks.
Do not store the camera in it's fitted case. The lining of these cases retains moisture and over time this could cause pin holes in the chrome plating to erupt with copper oxide. Most often seen in cameras from warmer and coastal areas, the pattern is almost always the same, on the wind lever, around the battery test button and the rear view finder. I have no idea why these areas are more vulnerable.
The filter ring mount on the front of the Yashica lenses is made of a very soft alloy. You can almost bend this by just staring at it. I used to joke that Uri Geller got his start this way before he moved on to bending spoons on TV. Robert Murray emailed in a suggestion that will strengthen and protect the thread. ' I have several of the GSN models', he writes, 'and with your help have brought them back to life. One trick I did find is that I look in my local photo stores bargain bins for the ugliest rubber lens hood in there I can get for near nothing in the correct size for the GSN. I cut away the rubber leaving a nice 3/8 of an inch black plastic ring I now use as a lens hood. The rubber part would be in the way of the rangefinder/meter anyway. Since this black plastic ring has filter threads it still allows for filters and keeps the dings away from the metal filter ring. Camera will still fit in the case with this attached and it really makes a good cheap hood'.
I should add that a UV filter will help, and in fact if you can find any scratched or cracked glass filters, simply break out the glass with care and screw the ring into the camera.
Q. Is there any way to take a double exposure with a Yashica Rangefinder camera?
A. On the camera bottom plate is the Sprocket Release pin to allow you to rewind the film when the roll is done without destroying the brass gears. To double expose... press in the sprocket release and hold it in... then wind the shutter with the film advance lever. It may be a good idea to hold the rewind crank just in case there is a bit of friction, so the film won't move. As you begin to wind the shutter the next time without holding the pin, it will pop out and you will be back to normal advance.
Q. I have seen Wide angle and Telephoto lens sets for sale on the web. How useful are they really?
A. One can only surmise that a 45mm Yashinon lens was selected as the primary lens on these cameras so as to give the Japanese user a little extra edge in shooting within the very confined space of their living quarters, land being at such a great premium. Distortion at that focal length can be held within pretty tight standards. When shooting extreme close ups such as portraits, this minor compromise has slightly more ramifications, than using a 50mm lens [the
default standard on a SLR]. The use of the Tele Adapter would help somewhat in rendering facial features more naturally. One really needs at least a 75mm - 100 mm lens to get portrait perspective
right, and the more that you drop down below that mininum, the worse facial feature distortion gets.The actual effect of these lenses can hardly be classified as Wide Angle or Tele by any means. A step or two backward or forward would do as much at indoor distances. So why even bother to tool up for production, you might well ask. According to my deep throat connection at the time, the rangefinder division used the excuse that they needed to provide a “complete system”, to be taken seriously in the trade, while in fact they were just trying to keep on par with the SLR boys. It was a time during which colour and other emulsions with ASA 25 speeds were in widespread use. Ektachrome, with the required Wratten 85 filter for daylight, was rated at ASA 16. 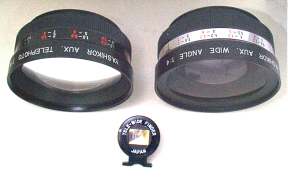 When either lens is in place, the sharpness is reduced and the maximum usable aperture setting should not exceed ƒ4.0. Extending the range of these add on lenses would have cut the maximum practical aperture to a point as to make the lenses unmerchantible. As it turns out, when used to capture shots at long distances such as scenic views, the 0.8X ratio of the Wide Angle or the 1.3X of the Tele, can add up. The most serious disadvantage of the W / T combo however, is the inability to take advantage of what the Yash Electros are all about.....speed! The reason is, that once you have focussed through the finder, you need to consult the conversion table on the W / T lens and reset the focus to that 'new' distance. The actual "Tele" focal length is equal to 58.4mm. The focal length with the "Wide Angle" lens is 37.7mm.Both lenses accept 72mm screw-in type filters. If the price is right, they would make a nice addition to your arsenal. A companion combo finder which mounts in the flash shoe is required. If it is missing you really can't make much use of the lenses. More data on these and similar lenses from second party makers can be found on the Classics page of this site. This may be your best source for an inexpensive replacement viewfinder. You can view or print out the Original data sheet. This is a large file [316k].
Go to Wide-Tele Manual
a "G" d
Q. My Yashica GSN is in great shape but the case fell victim to jungle rot. Does anyone still make a case for this camera.A. The after-market real leather case for the Canon AE1/ AE1P is a perfect fit for the Yashica G through GSN as well as the MG-1 models, and will give your camera a truly luxurious look. The 'secret' is that this case does not use a 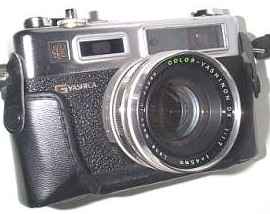 screw-in fastener at the bottom which would have to match the exact position of the camera tripod socket. Instead it attaches securely to the camera with a snap button loop that goes around each of the carry straps on the camera. These cases fit several other cameras and therefore do not have the Canon Logo on them. The case will not close with the lens shade in place. Take your camera along to the store to check other cases if this model is not in stock.
Q. I read that replacing the original camera mercury battery with another type gave incorrect exposures and that compensation had to be made by adjusting the ASA setting not only with a new battery, but from time to time as the battery charge was getting lower. This is all over the internet. What's the story?
A. The Yashica Electro Rangefinder camera created a revolution by being the first automatic exposure camera that was truly all electronic. It did not require a mechanical "exposure meter" type device [a galvanometer which is very 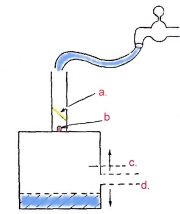 susceptable to shock] to accomplish exposure controls as was the case in other contemporary cameras. It uses a highly reliable
relay instead. The designers also envisioned problems that could occur with a system that was directly coupled to the battery. Battery life changes with each click of the shutter even though by an imperceptible decrease
susceptable to shock] to accomplish exposure controls as was the case in other contemporary cameras. It uses a highly reliable
relay instead. The designers also envisioned problems that could occur with a system that was directly coupled to the battery. Battery life changes with each click of the shutter even though by an imperceptible decrease
The illustration based on the Yashica Service & Repair Manual shows how the electrical current
flows into c/ the Holding tank (Condenser), monitored by a/ the CDS (Valve), b/ Trigger Valve (Switch 4) and flows to the d/ Lens diaphragm resistor. The Battery Test Lamp should turn on when 3.9
Volts are supplied and fail to turn on when the applied voltage drops to 3.5 V.
Q. Murphy's Law and all that, what if I am up a tree surrounded by lions and drop my battery?
A. Without a battery the Yashica G/GS/GSN will fire the shutter at the default speed of 1/500 th second. This would require setting the Aperture at 6.3 for ASA 100 film in Bright Sun. Allow a bit more exposure if the lions are in the shade of the tree, say 3.5.  A good
time to try this out is when you are not under pressure, so make a couple of test shots the next time that you have the odd frame or two left on the roll. [By the way, dropping a battery on a lion's head has been known to make them quite cross!]
A good
time to try this out is when you are not under pressure, so make a couple of test shots the next time that you have the odd frame or two left on the roll. [By the way, dropping a battery on a lion's head has been known to make them quite cross!]
Links:
The printer friendly Yashica Guy updated GX manual contains a considerable amount of useful information not readily found elsewhere that will be of interest to beginning photographers regardless of which camera they use. Click here to view or print the GX Manual
A 124 page free Yashica " G - GS - GSN " Service Manual which is quite unlike the rubbish sold on some websites is now available for download. Click this link to view or print the PDF Version. This may take 5 minutes at a download speed of 138 kbps
Bob Letsche has accomplished a remarkable task in creating a Yashica Time Line that tabulates the complete history of all the known cameras that the Yashica company produced. Click this link to view or print the PDF Chart. The chart also indicates the original battery that was supplied with all the powered cameras. To contribute your comments, suggestions or additions please contact Bob by email or you may send snail mail to Yashica Guy.
Check out the site that is one of the most helpful that you will ever find on various topics related to cameras. An amazing source for info on the Yashica SLR & TLR cameras lenses, medium and large format equipment Go to Robert Monaghan's site
The Yashica Guy's own manuals on this web site have been corrected for errors of ommisssion or commission in the originals. Some procedures are explained in more complete detail. If you would like to upload the original Yashica Manuals free, visit the Kyphoto resource which has manuals for numbers of cameras in addition to the Yashica Electro.
Kyphoto Manuals Index
An excellent copy of the manual for the Yashica 35W has been put on-line by Bob McClelland. This camera is basically the same as the 35J and 35M models, so this is a most useful resource. Yashica 35W Manual
There is an excellent French site which covers Yashica and other brands of rangefinder cameras. Yann L'hostis serves up valuable information not found elsewhere, including a Depth of Field Table for the Yashica Auto Up attachment. This table and other information can readily be used by speakers of any language.
French Language Rangefinder Resource
One of the most comprehensive web sites that has images and manuals for camera brands from from A to Z is run by Sylvain Halgand, who has been hunting fleamarkets in France since 1922 and has come up with amazing stuff. Many manuals are in English and can be found by navigating to "Notices" then click on "disponsible opposite your selection to view.Sylvain Halgand Resource
If you have the ambition and patience to take on the frustrating repair of one of the early Copal shutters as found in the Lynx and earlier models, don't even think about proceeding without checking out this link first. Henry Taber's Lynx 5000 shutter repair guide
For the Citizen shutter on the Minister III that you want to tackle go to
Stuart Willis takes on the Minister III shutter
For the visitors to this site seeking information on the classic Yashica Single Lens Reflex cameras, your search is over.... Drop in on Alan Corey's very informative web site:
The Unofficial Yashica Classic SLR Page
Wherever you are or wherever you are going, find a photo lab that's right for you in this extensive index which includes the US and most coutries that you may visit. While you are at it check out the forum on all things photographic at Acecam Photo Lab Index & Forum
Here is a useful Acecam directory of camera stores just about anywhere in the world.
Camera Store Directory and Resources.
A valuable site resource for original manuals of Yashica and other makers, all readily downloadable, is hosted by Mike Butkus. There is a wealth of information on many marques of cameras, lenses and accessories that you won't want to miss. Camera Manuals in PDF format
Finally for you guys in the U.K. we have received a very strong recommendation for the Yashica and other leading camera brand repairs. Newton Ellis & Co. (Est.1948) offer repairs and servicing to all Yashica cameras, including the Yashica 44, FR-1, Electro 35, Mat 124G etc. They also repair most other classic, modern and digital cameras and lenses. Their contact info is:
Newton Ellis & Company.
29 Cheapside, Liverpool, L2 2DY, UK
Telephone - 0151 236 1391.
Website - www.newtonellis.com
Email - admin@newtonellis.com
For our friends in India, I am now able to provide the details of a repair service for Yashica and some other brands in India. This comes from two separate persons who has had very favourable dealings with them. They may be too busy to answer emails:
Prittam Sons
Shop Number 6, Suman Market, 2nd Floor,
Esplanade Road, Chandni Chowk,
Delhi 110006, India
Phone : 011 - 23282769/23271410,23259591 Email : pritamsons@yahoo.com
To travel back in time to the era of the magnificent hand crafted view cameras which were an art form unto themselves, visit A great classic camera page
The Mother Lode of all photography links can be hard to find so don't miss this chance to bookmark it. In the left hand column on their site, is a list of categories within photography which narrows the thousands of links down somewhat. Photo Links Classic Camera Category
For the many visitors around the globe where French is spoken, as my neighbours in Quebec, just a short distance north of our home base in NY do, I would urge you to visit the site of Lionel Decaluwe. He has created a valuable resource covering a broad range of cameras of inumerable marques, together with manuals which in many cases provide English and French instructions & specs and photographs taken by some of these. 35mm Compact Camera Resource
If you have questions regarding the Yashica SLR cameras that use the Pentax Universal Screw mount [M42], or a round-up of the Yashinons lenses with that mount, and other hard to find info, check in with Markus Wottrich. A little knowlege of German would help.
Yashica SLR resource
If anyone out there is interested in refurbishing an EE model, here's a link to the assembly manual which unlike a lot of these things is an excellent copy.
Yashica EE Assembly Manual
I happen to think that there is nothing like getting hard copy into your hands, but the following magazines have a web presence and are well worth visiting. This will also enable you to decide if a subscription is right for you. You can order even outside their country of publication. The hot links are listed alphabetically. A click will bring you there. Just close their page to return here.
Amateur Photographer [Weekly]
Shutterbug [Monthly]
Missing from Yashica's list of Service Centers is Mark Hama who has 40 years of experience with Yashica repair and actually worked at the Japan factory building these cameras. He brought with him virtually all the spare parts for the discontinued vintage 35mm and medium format cameras. He is now located in Georgia, USA. Mark Hama
Thanks to Lee Scott for the scan of the famous Yashica Electro 35mm "Moonlight" ad, which ushered in a new era of automatic exposure control. To view or print it Click here
Go to Site Index
Send us an eMail !
We would like to hear your take on this site.
Entire contents of this web page including Text & Images are © 1999, 2013 Joe Marcel Wolff